Linux 백업 오픈소스 Bacula
Bacula
- Client 설정
- Server 설정
- 백업
- 복구
- 참고/에러
bacula는 linux, max, windows 등에서 사용할 수 있는 백업 오픈소스이다.
자세히는 아직 모르지만, 사용할때 잊지 않기위해 작성한다.
참고한 youtube 영상 이다.
클라이언트 설정
백업대상 서버 - VirtualBox CentOS 7 (192.168.219.108)
- 기본설정
$ yum install bacula-client bacula-console firewalld     # bacula-fd, bconsole 등 설치
$ firewall-cmd --zone=public --permanent --add-port={9101,9102,9103}/tcp  # 포트열기
$ firewall-cmd --reload
$ firewall-cmd --zone=public --list-all
- vi /etc/bacula/bacula-fd.conf
Director {
  Name = bacula-dir     # bacula-dir.conf의 Director 정보 (서버)
  Password = "PASSWORD"
}

FileDaemon {
  Name = bacula-fd      # Client가 사용할 명칭
  FDport = 9102
  WorkingDirectory = /var/spool/bacula
  Pid Directory = /var/run
  FDAddress = 192.168.219.108 # Client IP Address
  Maximum Concurrent Jobs = 20
}
- vi /etc/bacula/bconsole.conf
Director {
  Name = bacula-dir   # bacula-dir.conf의 Director 정보 (서버)
  DIRport = 9101
  address = 192.168.219.101 # Server IP Address
  Password = "PASSWORD"
}
서버 설정
백업 서버 - VirtualBox CentOS 7 (192.168.219.101)
$ yum install bacula-director bacula-storage bacula-console mariadb-server firewalld # bacula-dir, bacula-sd, bconsole, db 설치
- DB 설정
$ maria db-server firewalld
$ systemctl start mariadb
$ systemctl enable mariadb

$ vi /etc/my.cnf

[mysqld]
datadir=/var/lib/mysql
socket=/var/lib/mysql/mysql.sock
symbolic-links=0
#여기에 추가
character-set-server=utf-8
#
...
$ mysql_secure_installation   # 초기암호 설정임
$ systemctl start firewalld
$ systemctl enable firewalld
$ firewall-cmd --add-service=mysql --permanent
$ firewall-cmd --reload
$ alternatives --config libbaccats.so   # /usr/lib64/libbaccats-mysql.so 선택
$ /usr/libexec/bacula/grant_mysql_privilegas -p
$ /usr/libexec/bacula/create_mysql_database -p
$ /usr/libexec/bacula/make_mysql_tables -p

$ firewall-cmd --zone=public --permanent --add-port={9101,9102,9103}/tcp
$ firewall-cmd --reload
$ mysql -u root -p
$ set password for bacula=password('bacula');
$ set password for bacula@localhost=password('bacula');
$ show databases;     # 스키마, 테이블, 유저 등 잘 생성됬는지 확인해봐야함
- vi /etc/bacula/bacula-dir.conf
Director {
  Name = bacula-dir
  DIRport = 9101                # 위에 bacula-fd.conf의 Dirctor 정보가 여기임
  QueryFile = "/etc/bacula/query.sql"
  WorkingDirectory = "/var/spool/bacula"
  PidDirectory = "/var/run"
  Maximum Concurrent Jobs = 20
  Password = "PASSWORD"
  Messages = Daemon
  DirAddress = 192.168.219.101
}

JobDefs {
  Name = "FullBackup"
  Type = Backup
  FileSet = "Full Backup Set"
  Schedule = "BackupSchedule"
  Storage = BackupStorage
  Messages = Standard
  Priority = 10
  Write Bootstrap = "/var/spool/bacula/%c.bsr"
}

Job {     # Backup 용도
  Name = "BackupClient"
  JobDefs = "FullBackup"
  Pool = "BackupPool"
  Client = "bacula-fd"
}

Job {     # Restore 용도
  Name = "RestoreFiles"
  Type = Restore
  Client=bacula-fd
  FileSet="Full Backup Set"
  Storage = BackupStorage
  Pool = BackupPool
  Messages = Standard
  Where = /         # 서버가 터지면 새 서버에 덮어씌울 예정이라 복구 시 루트에 저장되도록 함
}

Pool {
  Name = BackupPool
  Pool Type = Backup
  Storage = "BackupStorage"
  Recycle = yes                       # 재활용 여부
  AutoPrune = yes                     # 정해진 기간이 지났을 때 자동으로 파일을 삭제할지 여부
  Volume Retention = 365 days         # 보관할 기간
  Maximum Volume Bytes = 50G          # 각 볼륨의 최대 크기
  Maximum Volumes = 100               # 최대 볼륨 수를 100개로 제한
#  Label Format = "Vol-"               # Maximum Volume Bytes 를 넘어가면 Vol-0001, Vol-0002 ... 로 이름을 짓는다.
#  Label Format = "backup-{Year}-${Month:p/2/0/r}-"
}

Storage {
  Name = "BackupStorage"
  Address = 192.168.219.101
  SDPort = 9103
  Password = "PASSWORD"
  Device = BackupDevice
  Media Type = File
}

FileSet {       # 백업 할것과, 하지않을 것 설정
  Name = "Full Backup Set"
  Include {
    Options {
      signature=MD5
      compression=gzip
    }
    File = /
  }
  Exclude {
    File = /var/lib/bacula
    File = /sys
    File = /run
    File = /proc
    File = /tmp
  }
}

#Schedule {     # 스케줄러
#  Name = "BackupSchedule"
#  Run = Full 1st sun at 23:05               # 전체백업 매월 첫째주 일요일 23시 5분
#  Run = Differential 2nd-5th sun at 23:05   # 차등백업 매월 둘째주 ~ 다섯째주 일요일 23시 5분
#  Run = Incremental mon-sat at 23:05        # 증분백업 월 ~ 토 23시 5분
#}

Client {      # Client 정보
  Name = "bacula-fd"
  Address = 192.168.219.108
  FDPort = 9102
  Catalog = MyCatalog
  Password = "PASSWORD"
  File Retention = 30 days
  Job Retention = 6 months
  AutoPrune = yes
}

Catalog {
  Name = MyCatalog
  dbname = "bacula"; DB Address = "127.0.0.1"; dbuser = "bacula"; dbpassword = "bacula"   # db에서 설정한 계정
}

Messages {    # 작업 시 메일로 로그를 보내줌
  Name = Standard
  mailcommand = "/usr/sbin/bsmtp -h localhost -f \"\(Bacula\) \<%r\>\" -s \"Bacula: %t %e of %c %l\" %r"
  operatorcommand = "/usr/sbin/bsmtp -h localhost -f \"\(Bacula\) \<%r\>\" -s \"Bacula: Intervention needed for %j\" %r"
  mail = leegicheolgc@gmail.com = all, !skipped
  operator = leegicheolgc@gmail.com = mount
  console = all, !skipped, !saved
  append = "/var/log/bacula/bacula.log" = all, !skipped
  catalog = all
}

Messages {
  Name = Daemon
  mailcommand = "/usr/sbin/bsmtp -h localhost -f \"\(Bacula\) \<%r\>\" -s \"Bacula daemon message\" %r"
  mail = leegicheolgc@gmail.com = all, !skipped
  console = all, !skipped, !saved
  append = "/var/log/bacula/bacula.log" = all, !skipped
}
- vi /etc/bacula/bacula-sd.conf
Storage {
  Name = BackupStorage
  SDPort = 9103
  WorkingDirectory = "/var/spool/bacula"
  Pid Directory = "/var/run"
  Maximum Concurrent Jobs = 20
  SDAddress = 192.168.219.101
}

Director {
  Name = bacula-dir
  Password = "PASSWORD"
}

Device {
  Name = BackupDevice
  Media Type = File
  Archive Device = /mnt/test
  LabelMedia = yes;
  Random Access = Yes;
  AutomaticMount = yes;
  RemovableMedia = no;
  AlwaysOpen = no;
}
- vi /etc/bacula/bconsole.conf
Director {
  Name = bacula-dir
  DIRport = 9101
  address = localhost
  Password = "PASSWORD"
}
설정은 완료되었다.
바로 백업과 복구를 해보겠다.
백업
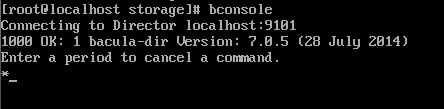
Server에서 bconsole 명령어를 입력하면 나오는 화면이다.
아래와 같이 어마어마하게 많은 명령어를 사용할 수 있다.
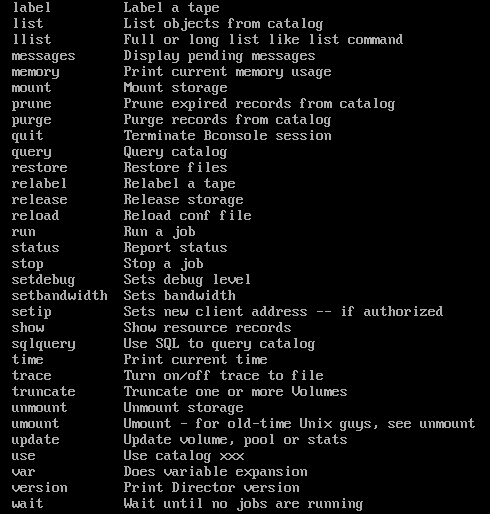
먼저 label을 설정해주고 run을 입력한다.
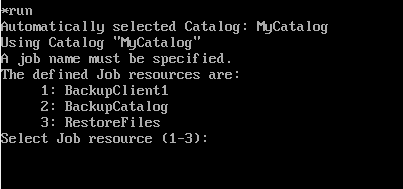
run을 입력하면 Job으로 등록한 이름이 나온다.
나같은 경우 첫 설정이 잘 안되다보니 사용하지 않는 Job도 포함되어있다.
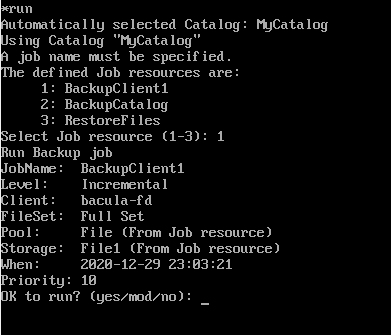
Job을 선택하면 백업을 시작할지 물어본다.
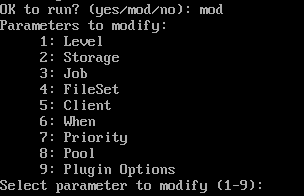
mod는 백업단계에선 크게 사용할 일이 없을듯하다.
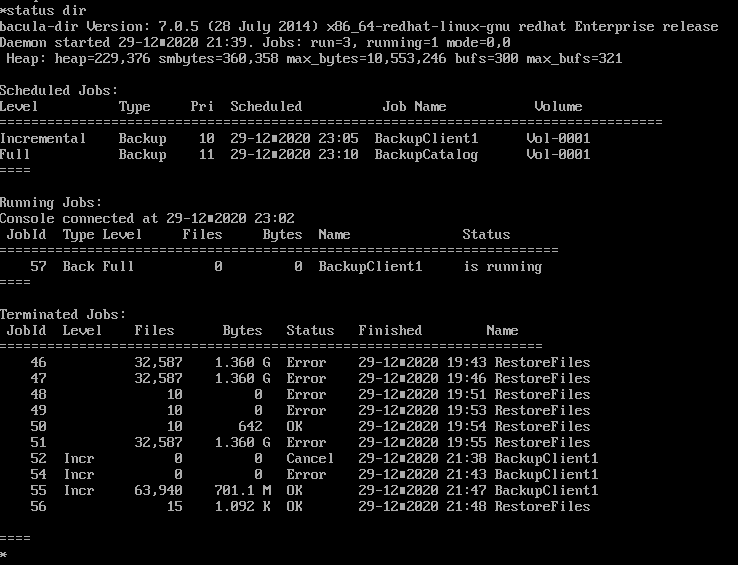

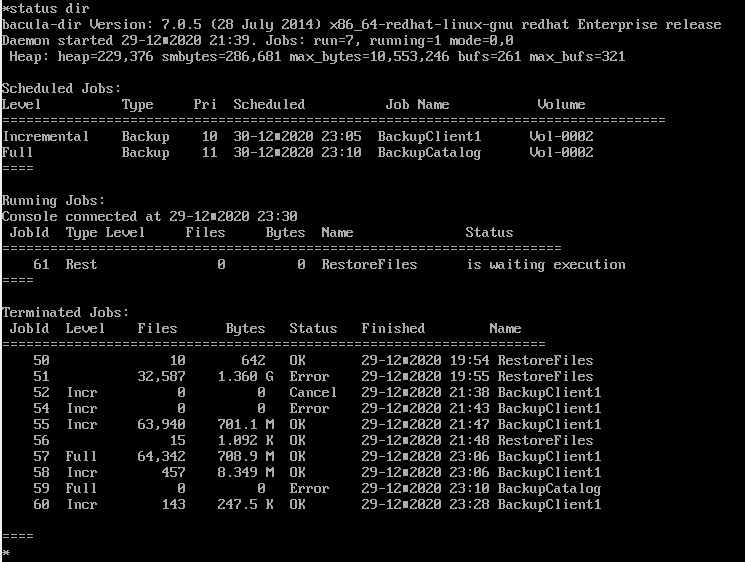
yes를 입력하고 status dir 명령어를 입력하면 위와 같이 현재의 상황을 보여준다.
추가적으로 status 만 입력할 경우 Storage나 Client의 상황도 볼 수 있다. (약자인 st도 가능)
현재는 백업이 잘 되어진 상황이다.
복구
다음은 Client에서 복구를 해보겠다.
마찬가지로 bconsole을 입력하면 아래와 같은 화면이 나온다.
바로 restore 명령어를 입력해 복구 화면으로 입장했다.
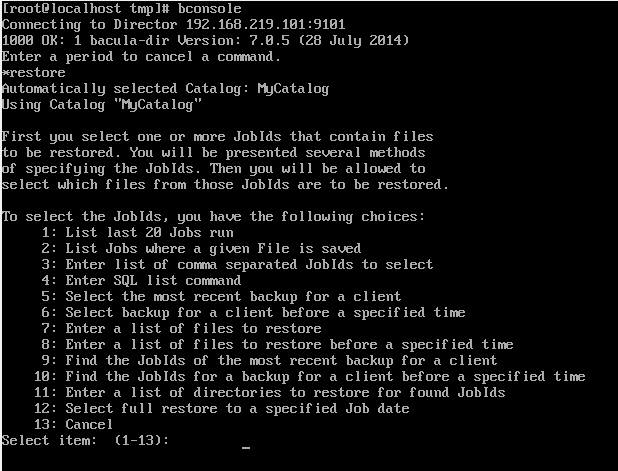
지금은 가장 많이 쓰이는 5번을 (클라이언트의 가장 최근 작업을 선택) 사용할 예정이다.
다음으로 많이 쓰려면 아래정도가 될 것 같다.
- 1번 : 마지막 20개 목록 출력
- 3번 : JobID로 선택
- 8번 : 특정시간대에 이전한 백업된 파일 중 복원할 파일명을 직접 입력
- 10번 : 특정 시간대 이전 클라이언트의 가장 최근 백업 ID 찾기
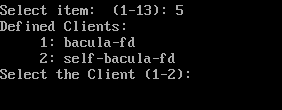
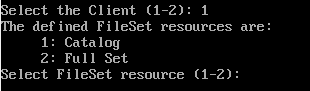
백업과 마찬가지로 Client, FileSet에 등록한 이름들이 나온다.
등록한 이름에 맞게 선택을 해준다.
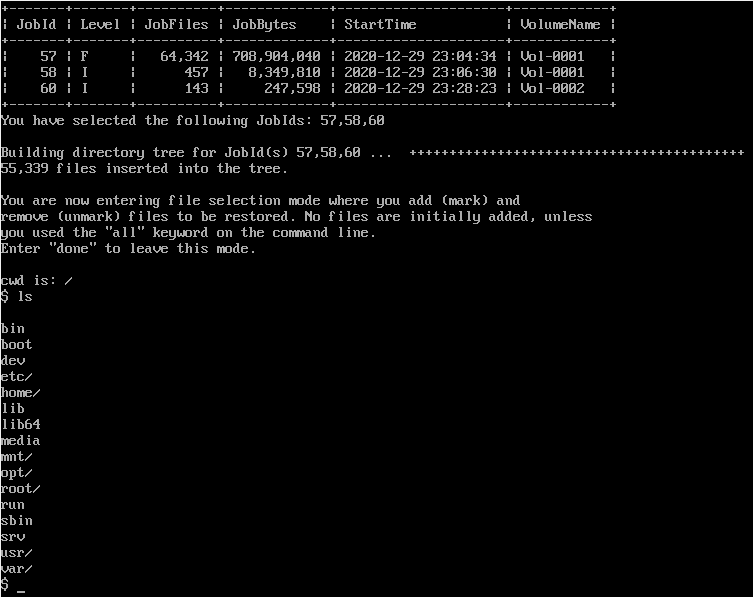
백업을 로딩하면 아래 Shell이 보인다.
ls와 같은 간단한 명령어가 동작하니 참고하자.
ls 명령어는 서버에서 백업한 목록을 출력한다.

지금은 home 디렉토리만 복구해볼건데, 위 사진의 맨위를 보면
$ mark home
$ done
두개의 명령어를 입력한 것이 보인다.
mark는 복구할 디렉토리/파일을 선택할 수 있다.
와일드카드도 (*) 사용가능하니 참고하자.
done은 선택이 완료되었다는 명령어다.
여기서 mod는 언제 복구할지, 어디에 저장할지 등을 수정할 수 있다.
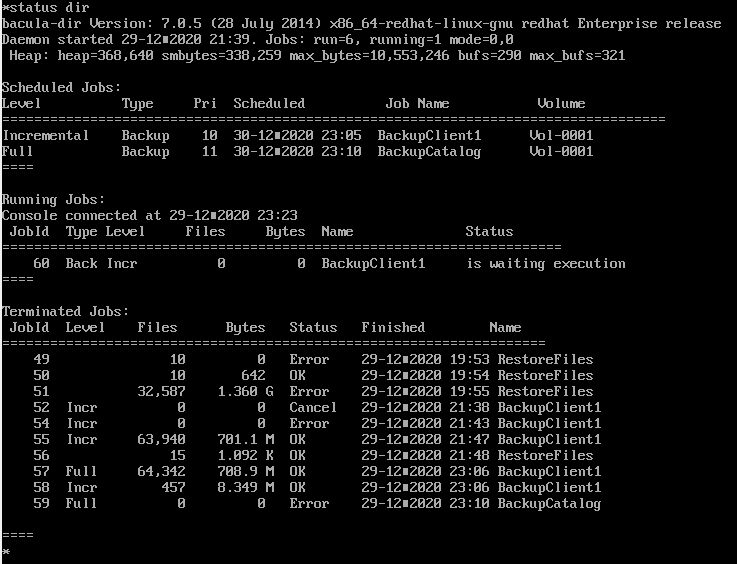
우선 yes를 선택하여 복구를 하고 status dir 명령어로 상태를 확인해보겠다.
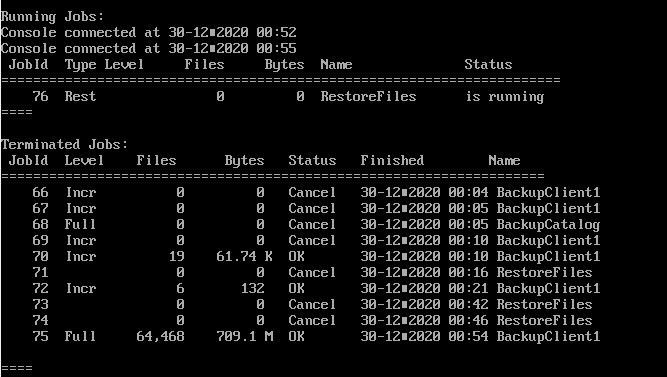
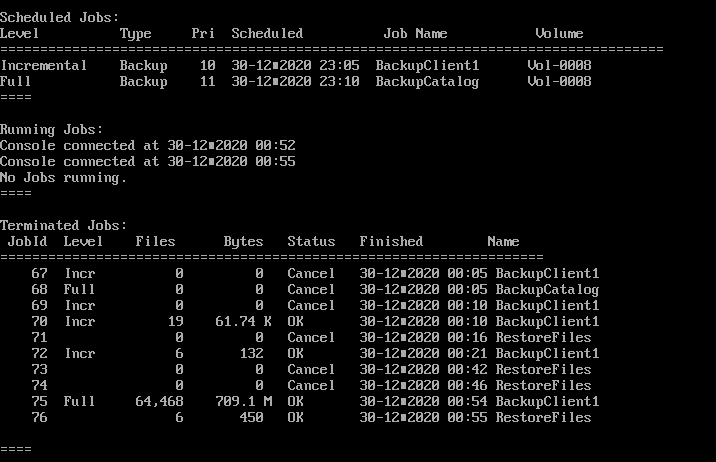
백업을 할때와 비슷한 화면이 나온다.
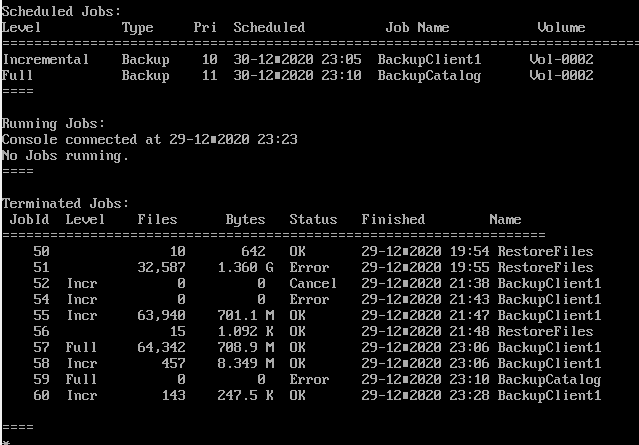
Running Jobs 의 name을 보면 RestoreFiles로 복구용 Job이 알맞게 매칭된것을 확인할 수 있다.
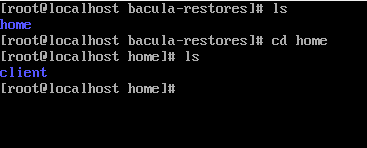
마지막으로 위에서 입력해둔 /tmp/bacula-restores 디렉토리에 home 디렉토리가 잘 복구된 것을 확인할 수 있다.
참고/에러
-
복구를 하다가 status dir을 확인해보니 “waiting for a mount request” 이란 메시지가 나오고 있었다.
혹시몰라 status sd를 확인해보니
“Device is BLOCKED waiting for mount of volume Vol-00001”
이런 메시지가 나왔다.해결방법으로 사용하지않는 Storage가 마운트되어서 에러가 난것으로 보이는데
나는 5개정도가 마운트 되어있었다.
bconsole에 delete 명령어를 사용해서 해결할 수 있었다. -
Bacula는 이름을 통해 호출/실행이 된다.
이름 잘못쓰면 실행조차 안될수 도 있다. -
Error: create_file.c:305 Could not symlink
하루종일 애먹게 한 에러이다.
서버에서 정상적으로 백업을 했는데, 클라이언트에서 복구 실패하면서 뱉은 에러이다.
검색을 아무리 해도 결과가 안나왔는데 우연치않게 다른 에러 해결방법을 보다가
SELinux 라는 것이 문제가 될 수 있다는걸 알게됬다.SELinux는 Security-Enhanced Linux의 약자로,
강제 접근 제어(MAC)를 포함한 접근 제어 보안 정책을 지원하는 매커니즘을 제공하는 리눅스 커널 보안 모듈이다. 강제 접근 제어는 디렉터리나 파일, 네트워크 소켓같은 시스템 자원을 적절한 권한을 가진 사용자나 그룹이 접근하고 사용할수 있도록 통제하는 것을 의미하며 보안의 중요한 요소중 하나이다.위는 그저 참고 사항이고.. 우선 getenforce 명령어를 입력해보자. 3가지 중 하나가 출력될 것이다.
- enforce
- permissive
- disabled
disabled 설정을 주면 이 에러는 해결이 된다.
보안문제로 SELinux를 끄면 안된다는 말도 있으니 끄기 전 고민해볼 필요가 있다.$ vi /etc/selinux/config $ vi /etc/sysconfig/selinux ... SELINUX=disabled ... $ reboot
업무에 활용할 때 최소한 버벅이지 않으려고 작성한 글이긴 하지만,
아직 모르는 부분이 너무 많아서 새로운 정보가 있을때마다 수정을 해야할 것 같다.
Leave a comment